Table of Contents
Table of Contents............................................................................................................................... 2
1. Introduction................................................................................................................................... 3
2. Creating the App............................................................................................................................ 4
2.1 Log In to the Development Dashboard....................................................................................... 4
2.2 Create a New App..................................................................................................................... 4
3. Configuring Distribution................................................................................................................. 5
3.1 Select the Distribution Method.................................................................................................. 5
3.2 Confirm Custom Distribution..................................................................................................... 5
3.3 Generate the Installation Link.................................................................................................... 6
4. Configuring App Settings................................................................................................................. 8
4.1 Application URLs....................................................................................................................... 8
4.2 API Access Scopes..................................................................................................................... 8
4.3 Requesting the Read All Orders Scope........................................................................................ 8
4.4 Redirect URLs........................................................................................................................... 9
5. Releasing the App......................................................................................................................... 11
5.1 Create a Release Version......................................................................................................... 11
5.2 Retrieve API Credentials.......................................................................................................... 11
6. Connecting to Finzite.................................................................................................................... 13
6.1 Navigate to the Shopify Integration.......................................................................................... 13
6.2 Enter the Credentials............................................................................................................... 13
7. Summary..................................................................................................................................... 15
1. Introduction
This guide provides step-by-step instructions for creating and configuring a custom distribution app within Shopify for use with the Finzite analytics platform. A custom distribution app enables a private, single-store integration between your Shopify store and Finzite, allowing secure access to order, product, and inventory data.
By the end of this guide you will have a fully configured Shopify app, the necessary API credentials, and a completed integration within your Finzite account.
Prerequisites: Access to a Shopify Partners or Development Dashboard, an active Finzite account with administrative privileges, and the target Shopify store domain.
2. Creating the App
The first step is to create a new application within your Shopify Development Dashboard. This registers the integration and provides you with a workspace for configuring API access, distribution settings, and redirect URLs.
2.1 Log In to the Development Dashboard
Navigate to your Shopify Partners account and sign in to the Development Dashboard using your credentials.
2.2 Create a New App
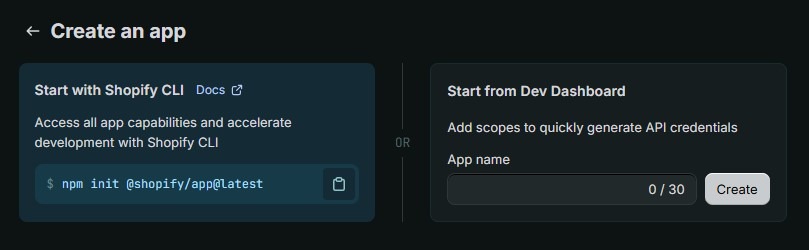
Locate the "Create app" button in the top-right corner of the dashboard and click it to begin the app creation process.

Enter a descriptive name for the app (typically your store name or a recognisable identifier) and click "Create" to proceed.
3. Configuring Distribution
Shopify apps can be distributed publicly through the App Store or privately via custom distribution. For Finzite integrations, custom distribution is required. This ensures the app is installed exclusively on your designated store.
3.1 Select the Distribution Method
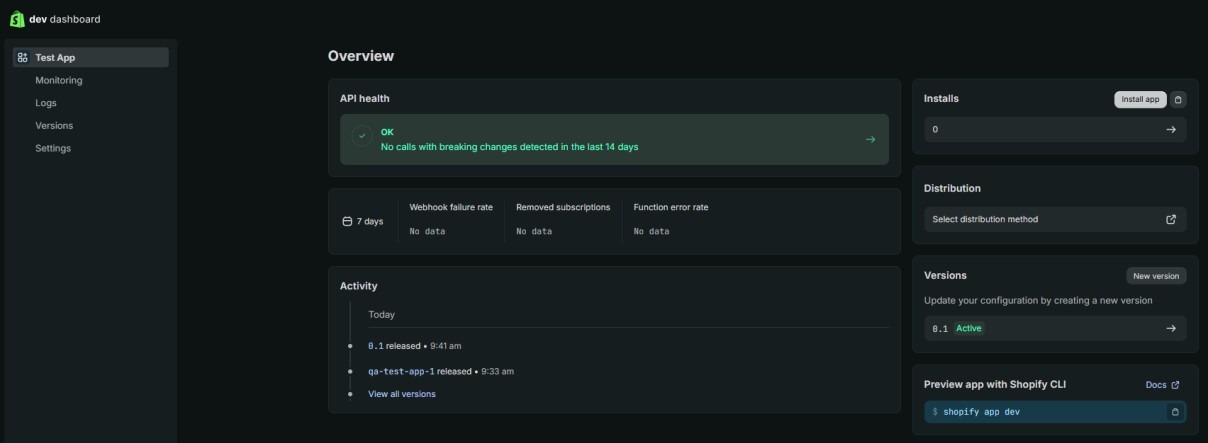
On the app overview page, locate the distribution panel on the right-hand side and click "Select distribution method".
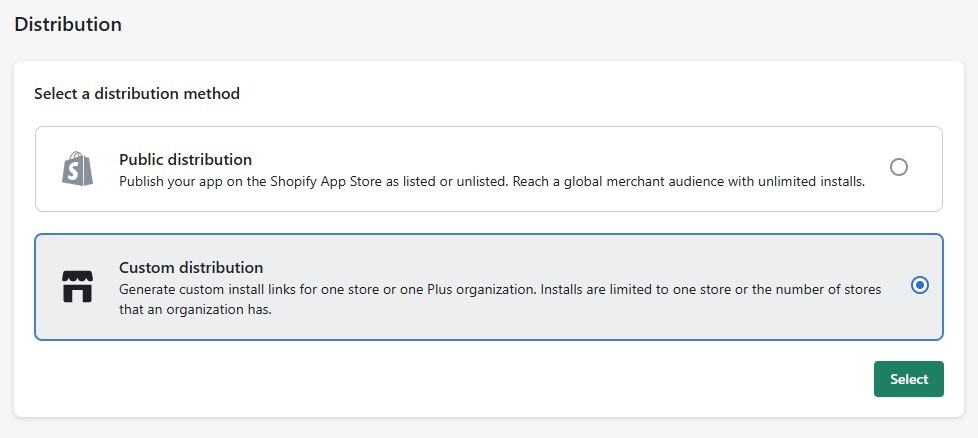
Select "Custom Distribution" from the available options on the following screen.
3.2 Confirm Custom Distribution
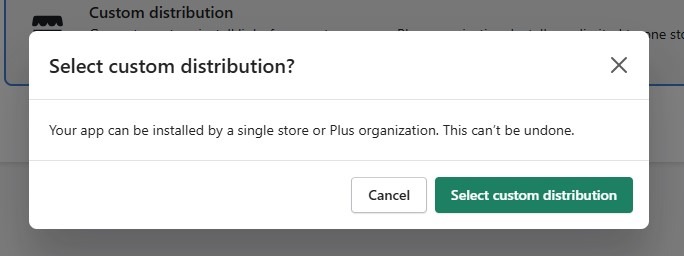
A warning dialog will appear outlining the implications of custom distribution. Review the information and click "Select custom distribution" to confirm.
3.3 Generate the Installation Link
Enter your store domain in the "Store Domain" field. Ensure that the "Allow multi-store install for one Plus organization" option is unchecked, as this integration is intended for a single store.
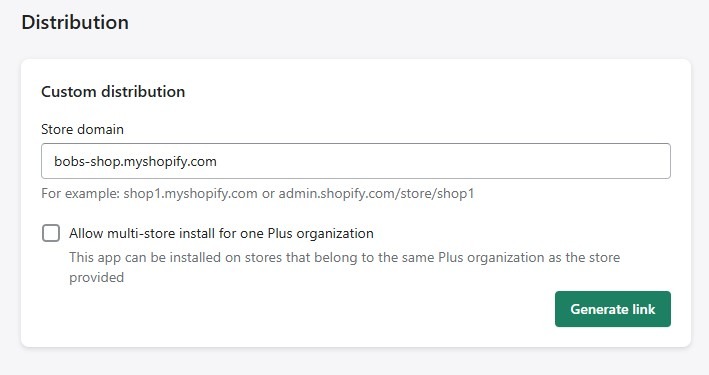
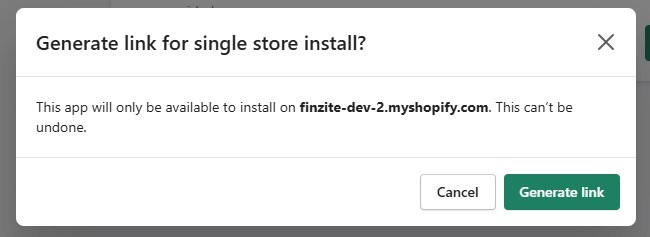
Click "Generate link" and confirm on the subsequent prompt.
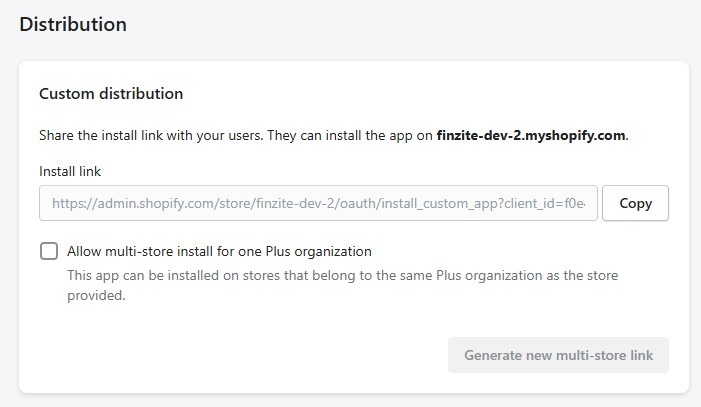
Important: Copy the generated installation link and save it securely. You will need this link when configuring the integration in Finzite.
4. Configuring App Settings
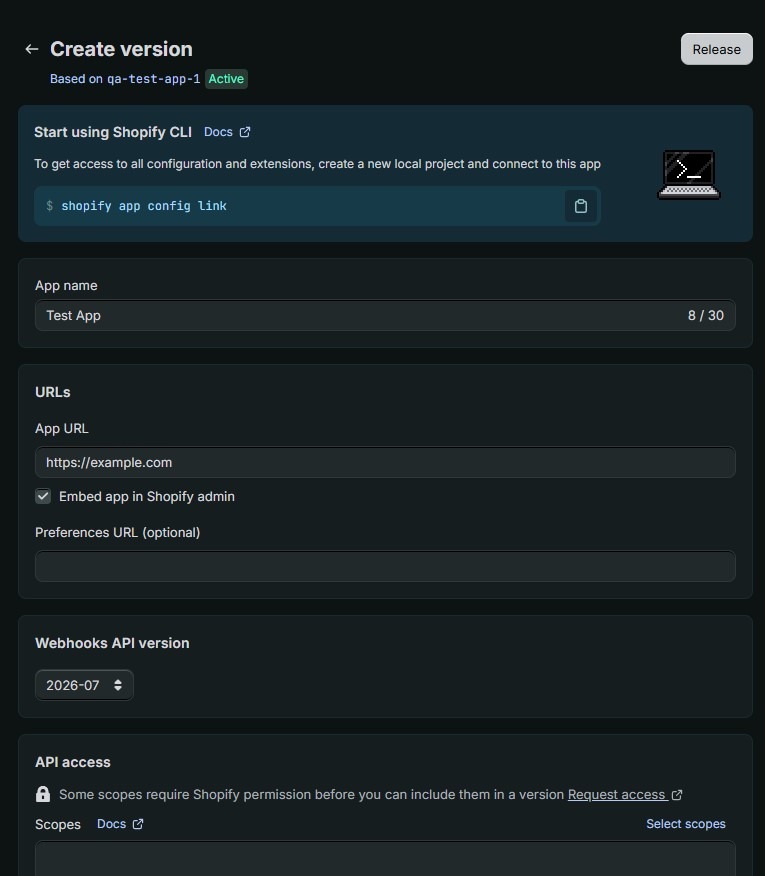
With the app created and distribution configured, the next step is to define the application URLs, API scopes, and redirect settings that Finzite requires to communicate with your Shopify store.
4.1 Application URLs
Enter the following values in the app configuration panel:
App Name: Your store name
App URL: https://app.finzite.io/integrations/shopify
Embed app in Shopify admin: No
4.2 API Access Scopes
The following API scopes must be granted to allow Finzite to retrieve the required data from your store:
read_all_orders, read_inventory, read_locations, read_markets_home, read_orders, read_products, read_shopify_payments_payouts
4.3 Requesting the Read All Orders Scope
The read_all_orders scope requires additional permissions. Navigate to the scope selection panel and click the "Request access" link at the bottom of the screen.
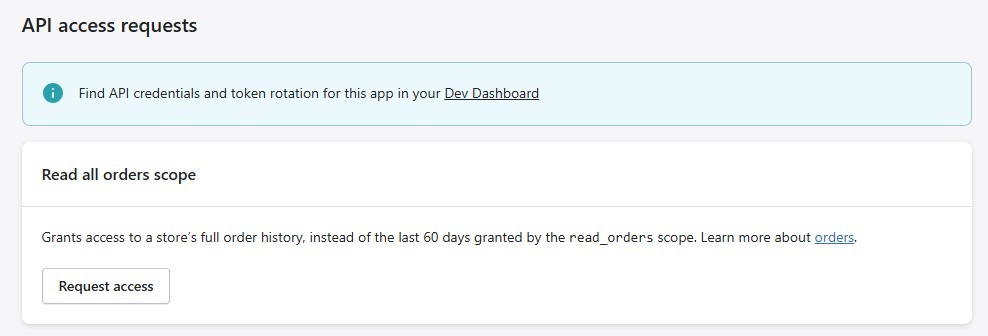
When prompted, provide a justification such as "Our application requires access to more than 60 days of orders" and submit the request.
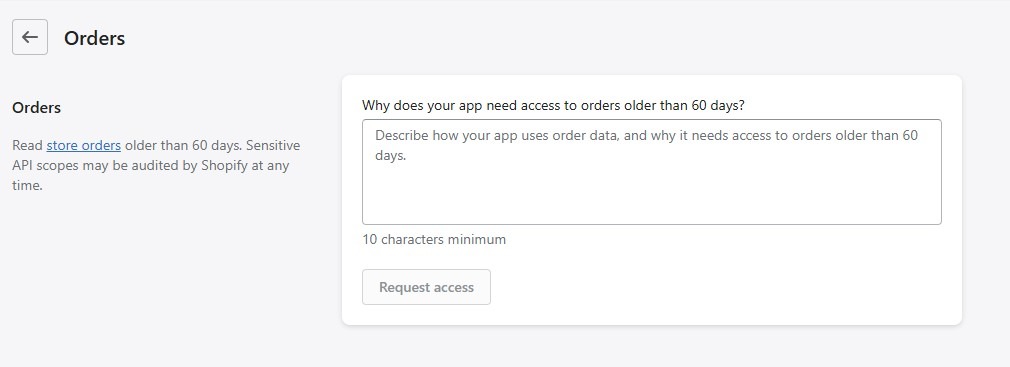
Once approved, the scope will be confirmed as active for your app.
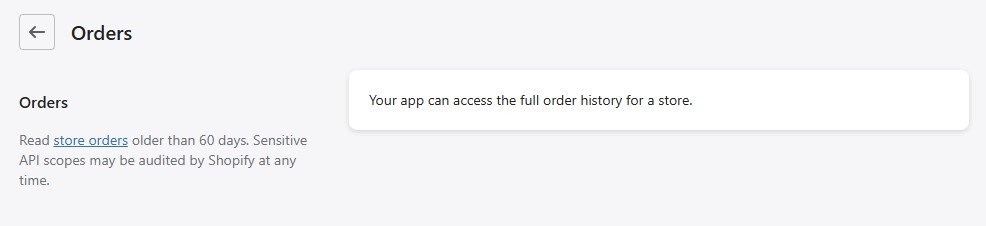
Once you have gone back to the settings page, make sure you refresh the page.
4.4 Redirect URLs
Return to the Development Dashboard and navigate to your app’s configuration settings. Enter the following redirect URLs:
https://app.finzite.io/integrations/shopify
Ensure that Use Legacy Install Flow is set to No.
5. Releasing the App
After all settings have been configured, the app must be released to make it available for installation on the target store.
5.1 Create a Release Version
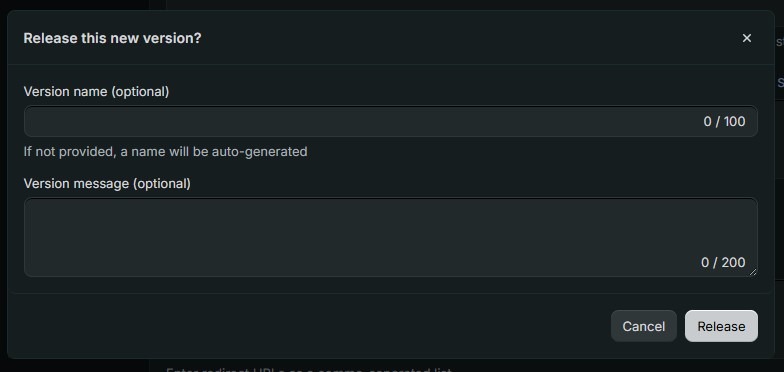
Click the "Release" button at the bottom of the configuration page. When prompted, enter a version name (for example, "1.0") and confirm.
5.2 Retrieve API Credentials
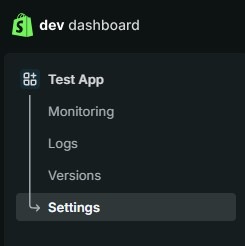
Return to the Development Dashboard, select your app, and navigate to "Settings".
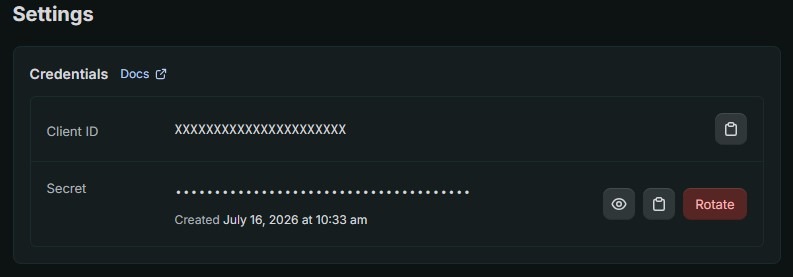
Important: Record the Client ID and Client Secret displayed on this page. These credentials are required to complete the Finzite integration and should be stored securely.
6. Connecting to Finzite
With the Client ID, Client Secret, and installation URL to hand, the final step is to enter these credentials into Finzite to establish the connection between the two platforms.
6.1 Navigate to the Shopify Integration
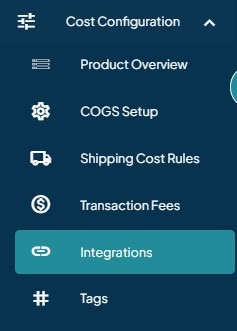
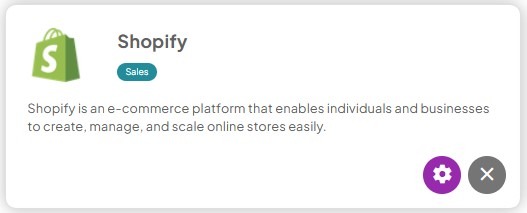
In Finzite, open the left-hand navigation menu and select "Cost Configuration", then choose "Integrations" from the sub-menu. Locate the Shopify card and click "Manage".
6.2 Enter the Credentials
Click the settings icon (cog) on the Shopify integration card and enter the Client ID, Client Secret, and installation URL in the fields provided.
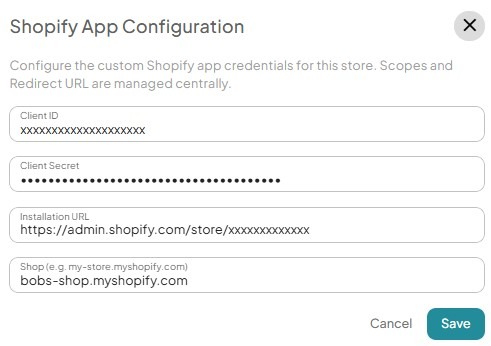
Once saved, the integration will be active and Finzite will begin synchronising data from your Shopify store.
7. Summary
This guide has walked through the complete process of creating a custom Shopify distribution app and connecting it to Finzite. To recap, the key steps were:
1. Creating a new app in the Shopify Development Dashboard.
2. Selecting and confirming custom distribution, then generating the installation link.
3. Configuring the application URLs, API scopes, and redirect URLs.
4. Requesting the read_all_orders scope for full order history access.
5. Releasing the app and recording the Client ID and Client Secret.
6. Entering the credentials into Finzite to complete the integration.
If you encounter any issues during the setup process, contact the Finzite support team for assistance.
Was this article helpful?
That’s Great!
Thank you for your feedback
Sorry! We couldn't be helpful
Thank you for your feedback
Feedback sent
We appreciate your effort and will try to fix the article
